ISO for landscape photography

Choosing the right iso for landscape photography

ISO FOR LANDSCAPE PHOTOGRAPHY

Today iā€™m talking about choosing the right iso settings for landscape photography and why it is so important for getting sharp photos. There's also a little money saving tip too.

So briefly,

What is ISO ?

ISO controls your cameras sensor sensitivity to light. The higher the ISO, the more sensitive the sensor is, the lower the iso, the less sensitive the sensor is to light. Increasing the iso will amplify the gain of the sensor which will add digital noise to an image. So generally speaking, keeping the ISO as low as possible is what we are looking for in landscape photography. The lower the ISO the cleaner the image will be.

So with this in mind, why increase it at all?

Well, there are several reasons why we should increase the ISO. Generally speaking, it is to control motion in one way or another.

Shooting handheld

So firstly and probably the most obvious is when we are shooting handheld. If we are not using a tripod we will introduce camera shake to our image if the shutter speed is not fast enough. As a rule of thumb, your shutter will need to be at least equal to the focal length of your lens to control the shake. I like to go a little beyond this, but it will depend on how steady your hands are. Just do a little experimenting and you will find out. So a 200mm focal length will require a shutter speed of at least 1/200th of a second. This shot was at 1/60 sec and you can see the shake in the image.

camera shake with a low iso and shutter speed

Now generally for landscape photography, I select my aperture as one of the first steps of composing my shot. This will be set depending on the depth of field required. So say I'm shooting at f8 to make sure I can get my scene nice and sharp, I now only have one other way in which to control my shutter speed to get a balanced exposure with my camera settings and that would be with my ISO. The higher I increase the ISO the faster the shutter speed will be needed to get the correct exposure. The higher the ISO the more sensitive the sensor is to light meaning the time required for the shutter to be open will be less, the quicker the shutter, the less camera shake.

EG - For this particular shot with a focal length of 200mm at f8, to gain a 1/200 sec shutter speed I needed iso 800

higher iso means a faster shutter speed

I always say it's better to have a noisy image than a blurred image, at least you can reduce noise in post-production, you cannot correct camera shake.

Some cameras and lenses offer image stabilization which will help in this regard, They allow you to shoot at lower shutter speeds than the rule of thumb mentioned above. Focal length = shutter speed.

Using ISO to control motion blur

Secondly, we can use ISO to control motion blur from a creative point of view. Quite often with a landscape photography shot, we are faced with the challenges of wind.

Wind will obviously move grasses, trees and the like. It can move the camera too if it's strong enough, even if we have it locked on a tripod. So again we can increase our ISO to get a fast enough shutter speed to be able to freeze that motion.

Experimenting here will be the way to go as it will depend on the amount of motion that you are trying to freeze.

Take this shot of some Barley for example, I have chosen an aperture of f11 to get my subject sharp from front to back, but my shutter speed is only 1/30th of a second with my iso at its lowest - iso 200.

motion blur with a slow shutter speed

Look at the motion we are capturing in the grass, this may be the look we are going for, but we might also like to eradicate that motion. So we will just need to increase our ISO which will, in turn, increase our shutter speed. Now we are at 1/125th sec and that motion is now frozen.

faster shutter and higher iso to freeze motion


Getting creative with motion blur

So from a creative point of view, we might also like to introduce motion into our photographs, moving water is a great example of this. Here we have 2 shots of 2 different waterfalls, one shot at 1/4 second and the other shot at 2 seconds. The difference is very apparent.


waterfall long exposure with higher iso
waterfall with low iso and long shutter speed

Save money with ISO

So this brings me onto my little money saving tip, Quite often to gain a slow enough shutter speed for adding creative movement to the water we will need to introduce a filter to control the amount of light entering the camera. Filters are measured in the number of stops of light that they will reduce.

A stop of light is a universal measurement that can be applied to the aperture, shutter and ISO.

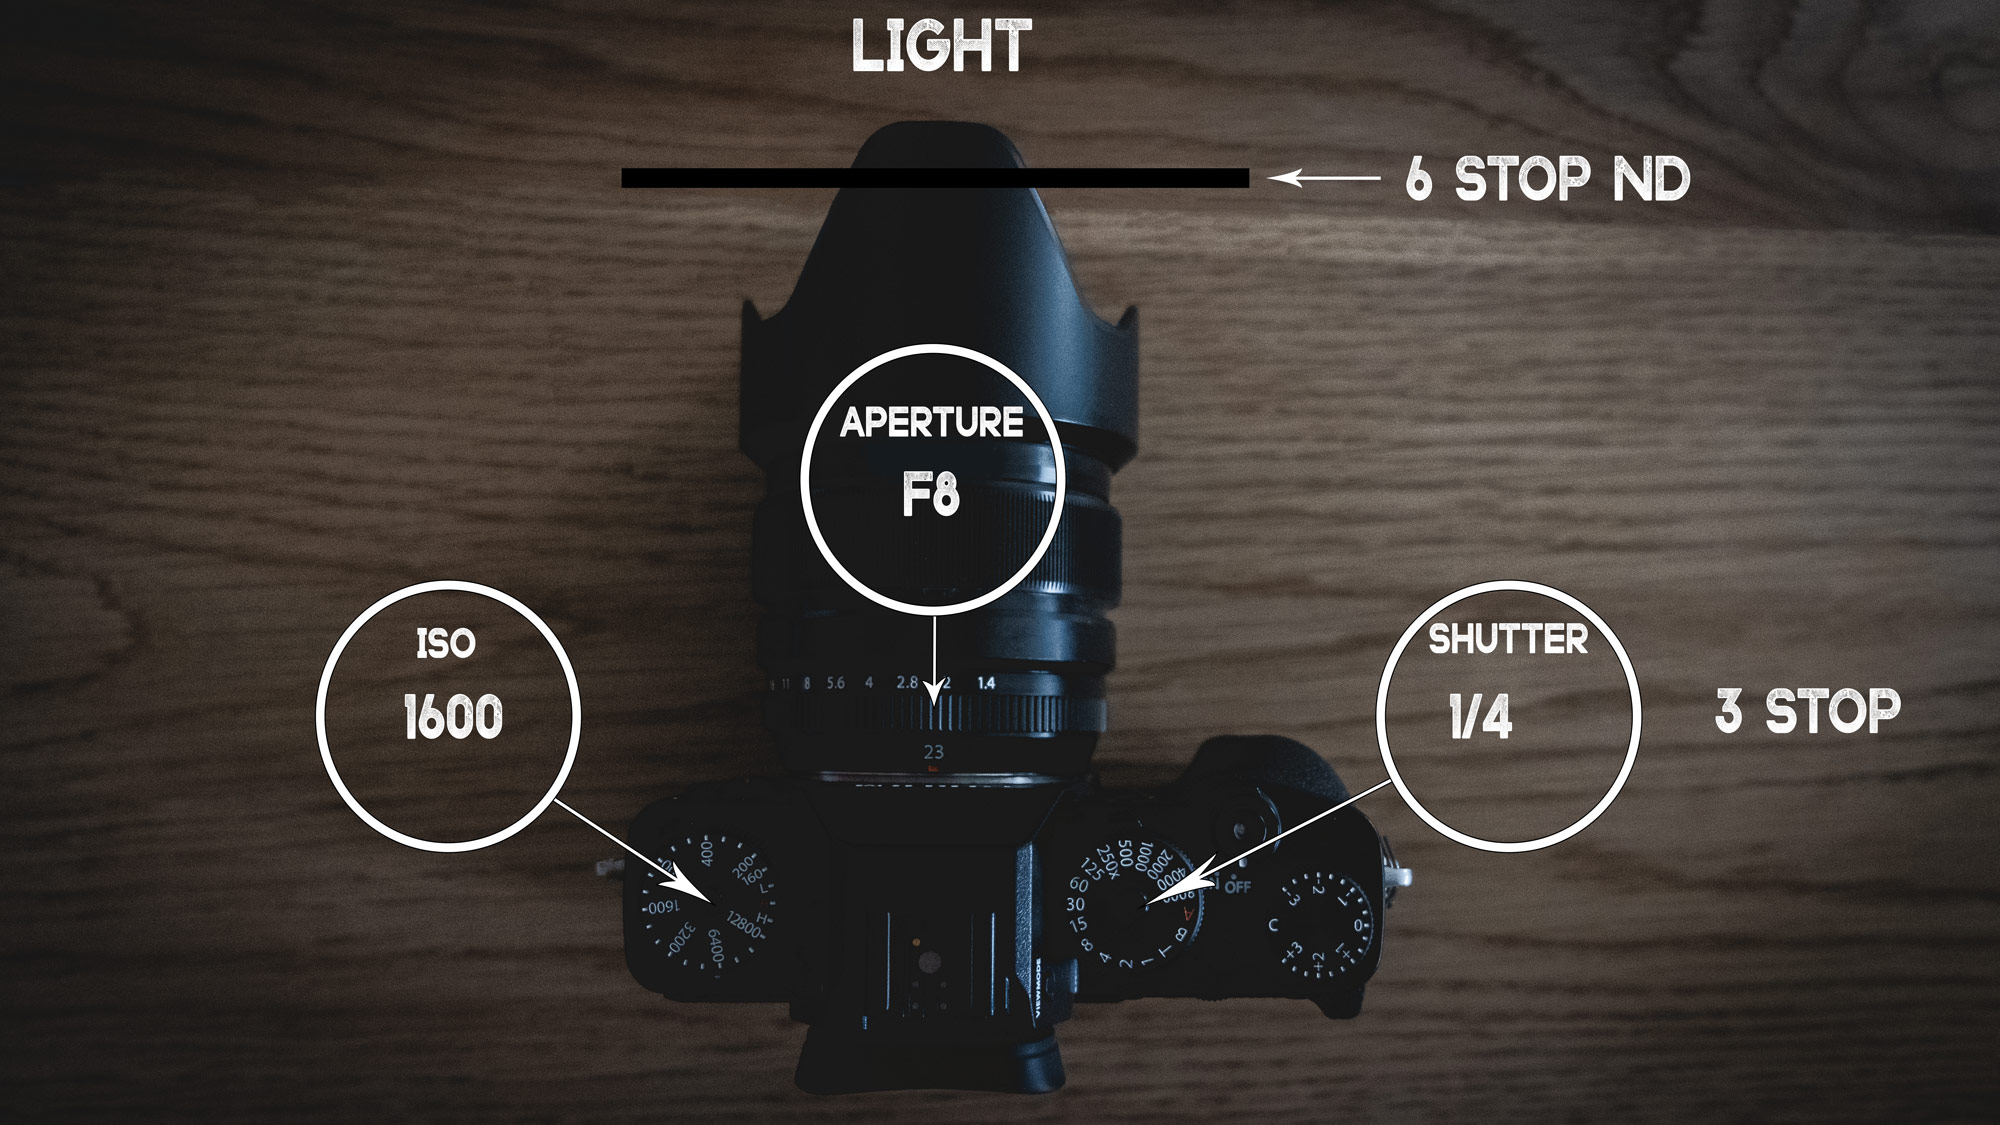
Putting a 6 stop ND filter on the front of the camera will reduce our shutter by 6 stops of light. So if our unfiltered shot was 1/30sec adding a 6 stop ND filter would take our shutter speed to 2 seconds for the correct exposure.

how to use iso for landscape photography

Say though we didn't want that really dreamy, milky look, we just wanted to add a little bit of motion blur to the water to help us retain the texture. Well, our option would be to add a 3 stop filter instead which will give us a 1/4 of a second exposure time for our example.

using iso in photography

Now filters are expensive things and I personally do not have a 3 stop. I have a 10 and 6 but the thought of paying out more money and carrying more wait for a 3 stop is a little off-putting. So what I do in this situation is just increase my ISO up 3 stops. Whilst using the 6 stop filter, this will give the same result with a 1/4 of a second shutter, just with a little more noise but at iso 1600 it so negligible that you cannot really see it, unless you are pixel peeping of course.

how to use iso

Potentially you could do the same with a 10 stop filter and use your ISO to increase the number of stops of light if required, but one thing to mention is that the longer the exposure time the more likely you are to notice the noise in the image. Shooting towards the direct sunlight will also intensify the amount of visible noise as will pushing your post processing too. So just a few things to look out for.

You could also increase your F number by 3 stops and take the filter off all together. This would give us the same 1/4 of a second exposure time for our example.

It is worth noting that using very high f numbers such as f22 can cause lens diffraction. This happens when the aperture of the lens is very small and can result in a softer image than increasing the iso, but again experimenting with your settings will yield the best result.

So, as a rule, keep your iso as low as possible but don't be afraid to use it when necessary. ISO is a wonderful tool to use in the correct circumstances. If you would like to learn more about ISO, take a look at the video below and don't forget to subscribe for weekly landscape photography content.

As an Amazon Associate I earn from qualifying purchases.


kinder Scout circular walk from Snake pass

Kinder Scout walk from Snake pass, Peak district.

kinder scout circular walk from snake pass inn

Kinder Scout height

Kinder Scout is the peak districts highest point at 636 meters above sea level. It is also considered a mountain, being 26 meters higher than the required height for mountain status. It's only one of three actual mountains in the peak district, the other two being Bleaklow and Higher shelf stones.

THE WALK

Distance - Approx 5 miles

Height gain - Approx 300 meters.

Difficulty - Fairly strenuous towards the top.

This circular walk to kinder scout starts at snake pass Inn. Free parking is by the Inn at a small layby. There's also a larger parking area further towards the wooded area a little way up the A57.

kinder scout walk from snakes pass

At Snake Pass Inn, cross the road and head for the walking track that you will see straight ahead. This will take you through a recently deforested area towards a footbridge that crosses the river Ashop, the footbridge is around 400 meters South East of the Inn.


After crossing the footbridge you will bear left on a well-trodden path for several hundred meters. Cross flat ground until you see Fair brook which flows into the river Ashop. This is the start of the ascent to kinder scout.


Fair brook offers some beautiful spots for photographs should you have the time to stop. Lone trees and tumbling cascades, Fair brook has it all. However, you will need some shade to get the most from this spot as the light in the gorge can be particularly harsh and getting a balanced exposure somewhat difficult. Wait for cloud cover or when the sun dips behind the top of kinder for a more balanced shot. There are lots of nice rocks to sit and ponder along the way too, so if you fancy a break or a spot of lunch, the area around 2/3rds of the way up is perfect.

fair brook kinder scout peak district

You will follow the well-trodden path up the steady incline, keeping the brook on your left all the way to the summit. It is probably around a mile and a half to two miles from the river Ashop to the top. The going is fairly moderate with the odd rock or two to hop over as you approach the top. Make no mistake though, this route will get the blood pumping and a well-earned rest will be needed when you finally reach the top.


Now standing on the kinder plateau you will see some delightful rock formations to your right. Spending time here will be well worth it.

In the early summer months expect to see cotton grass in abundance. Later in the summer around August time, heather blooms giving of an incredible carpet of purple flowers. look out for Grouse and mountain Hare which reside on the plateau. The area is mainly bogland or peatland which is made from decaying plant life such as mosses and heathers. This decaying material over time turns to peat and can run several meters thick. Peat bogs are very fragile environments indeed and store the majority of the world's carbon. Damaging these environments can have a serious negative effect on the planets co2 emissions and in turn can lead to global warming.

kinder scout circular walk

After wandering around the rocky ridge that leads to Fairbrook Naze you will begin to see your descent. When you see the toadstool, which is a small rock formation that looks like a toadstool, you will have reached the turning point for this walk. From here you will see spectacular views stretching back towards snake pass and if you are lucky some nice light over Bleaklow for a photograph.


From the toadstool you have a couple of options. You can either retrace your steps, which is recommended, if you fancy taking some more photos of Fair brook and its wonderful cascades, or you can find your way back across the moorland. Finding a route shouldn't be difficult as you will be able to see what lies ahead as you walk down. I do believe this area will become quite boggy in the wetter months though, so perhaps something to think about before returning. The path across the moorland is joined by many other tracks, but if you keep in mind that you want to follow Fair brook and keep right, you will soon be able to see Snake pass Inn at the Ashop valley floor. Head back to the footbridge and you will be back at Snake pass Inn before you know it.

kinder scout, peak district, landscape photography

Things to watch out for

The central plateau of kinder scout is largely made from peat bogland which has many natural paths, ditches and groughs. During the wetter months, finding yourself knee deep in mud will be a common thing. Try to stick to the stoney pathways. The plateau has many paths, but for this particular walk you will stick tight to the edge when you arrive at the top. Getting lost on the moorland is fairly easy when the weather closes in. It all looks the same when the mist descends. If you find yourself scrambling on your hands and knees when on your descent, you will have run off course. Retrace your steps and find an easier route. OS Explorer map OL1 which is for Dark peak will give you a detailed view of the area and I would advise putting the downloadable version on your smartphone. View the map on Amazon https://geni.us/FAhVAK8. This will help with your navigation should the mist come down.

I would say this is a fairly strenuous walk and a good level of fitness is advisable. Walking poles will help, especially if you are carrying a lot of gear. Make sure to bring waterproofs, several litres of water and good walking boots. Parking on the A57 can be a little difficult during busy weekends, also be wary of the traffic on this bendy part of the road when crossing.

To find out more about this fabulous walk, consider taking a look at the video below which will give you an idea of the terrain. Drop me a sub if you like it šŸ‘

Check out my photography gear

As an Amazon Associate I earn from qualifying purchases.

Tryfan circular walk from the Ogwen valley, Snowdonia national park.

Snowdonia circular walk around Tryfan.

ogwen valley snowdonia circular walk

This incredible walk which starts in the Ogwen valley, really is one of the finest walks I have undertaken here in the UK and one that is highly recommended.

If you are feeling up for it and have a decent level of fitness, a fairly easy scramble to the summit of Tryfan really adds to the whole experience. If you feel like camping there are two options that are actually on the route itself. The first, which is the one that I stayed at, Gwern Gof Uchaf the other which is further away from Llyn Ogwen, Gwern Gof Isaf. Both are around Ā£6 per night, per person, links to the campsites are below.

The main reason I chose Uchaf was that it meant having less distance to cover at the end of the walk as I was staying as long as possible on the mountain for my sunset photograph.

I never actually met the owners of the campsite as they were not around, so I just pitched up and posted my cash through their letterbox.

Another good choice for this walk would be to wild camp, there are lots of good places to pitch up for the night, but if you do, make sure you are discreet, pitch up late and be on your way early. Please remember to take your rubbish with you.

Free parking is available in laybys along the A5 by Llyn Ogwen.

tryfan walk from the ogwen valley snowdonia

Tryfan walk from Llyn Ogwen

Circular route elevation approx 450m with Tryfan summit approx 700m

Circular route distance approx 6 miles with Tryfan summit approx 7 miles

Difficulty: This is a strenuous walk, going very strenuous with scrambling if you go to the summit of Tryfan


My walk started at the Gwern Gof Uchaf campsite, postcode LL24 0EU and headed away from Llyn Ogwen. I recommend taking the old miners road which actually runs behind the farmhouse at the campsite. You will see the walking track sign post next to the farm house, head through a gate and over a wall style and follow the slate gravel track. It runs a few hundred meters adjacent to the A5 and will eventually take you to the other campsite, Gwern Gof Isaf.


Before you arrive it might be a good idea to take a few shots of Tryfan as the views from this side are quite beautiful and work really well for sunrise as the sun will illuminate that face.

Tryfan snowdonia national park

photo settings 100sec iso 200 f7.1 15mm

At Gwern Gof Isaf campsite you will see a ridgeline called Briach y Ddeugwm, make your way over the wall style, follow the ridge and keep as high as you can on the ridgeline, all the way until you reach the small pools of Llyn Caseg Fraith. This is another great spot to take a shot of a different angle of Tryfan. From this side you can clearly see the south peak and the wall that you will follow should you be attempting a stomp to the summit.

 
Llyn Caseg Fraith

photo settings 250 sec iso 200 f8 24mm

At Llyn Caseg Fraith you will have ascended around 400m and travelled around 2 miles so it's a great spot to rest even if the light isn't great for a photograph. After moving on a few hundred meters you will reach the miner's track which will take you across a scree slope to the wall that you will see running up the south face of Tryfan. It's worth pointing out that the first part of the scree walk is downhill for a hundred meters or so but you quickly regain that lost elevation as you head for Tryfan. Eventually, you will reach the wall at the south face of Tryfan where you will see the wall style. As soon as you have climbed over the wall you will be greeted with spectacular views looking down the valley over Llynn Bochlwyd and on a clear day out to the Irish sea. Another great spot for a rest and a well-earned snack. At this point, you will be half way if you are not taking on Tryfan.


Decision time.

If you decide you fancy the walk up to the summit now is a good chance to check your weather app. The weather can change really quickly in the mountains and it easy to get thrown off course in poor visibility. I really recommend having the OS map app on your phone. You can pick up The OS map explorer OL17 here on Amazon https://geni.us/FCh1f Make sure to buy the one that has the downloadable version. This will clearly show the route to the summit as it is so easy to veer off course on the final 100-meter scramble.

Starting off you will follow the path that veers slightly left, but you should head back to the wall and keep the wall on your right as you head up and over the south peak. This section is clearly marked as the path is well trodden. Eventually, the stone wall will come to an end and you will see a wall style on your right. Ignore that and try to find the start of the summit scramble which is just to the left.

You will be able to make out the scramble as the rocks are well worn, just keep looking ahead as it is easy to veer off the path and then things become a lot more difficult. I found this out and had to turn back after 50 metres or so. Next up its a fairly easy scramble to the summit. There is only one dodgy part which steps up to a very exposed edge, just stay to the left here and you will be golden.

The views from the top are just incredible and well worth the slog.

After relaxing on the summit for a while your decent will begin, from here you will just retrace your steps back to the start of the wall. Next, you will descend down to Llynn Bochlwyd but it is well worth stopping for some jaw-dropping images of the valley that lies beneath.

Llynn Bochlwyd snowdonia

photo settings 50sec iso200 f8 24mm 2 shot pano

The path will continue on the right-hand side towards the start of your final descent to Ogwen cottage.


As you reach the end of Llynn Bochlwyd you will see the outflow which is the start of Nant Bochlwyd, You will need to cross this and follow the path that runs beside it all the way to Ogwen cottage. It's an easy path to follow as it is made from placed stones and runs to the left-hand side of the stream. The rest is straight forward. Come out of Ogwen cottage back on to the A5.


Make your way back to your car or campsite. Happy days :)

Things to look out for -

With this being a circular walk, Tryfan will always be on your right-hand side unless you are standing on it. Having it on your left will mean you have veered off course. There are countless photographic opportunities along the way, I usually pick out a couple for each of my hikes, I try to focus on spending longer working a composition and getting the most from the scene than trying to shoot lots of different things.

That being said when the clouds come in and the light is fleeting, photographic opportunities will come thick and fast so having a good telephoto lens is a must for this walk. Keep your eyes open and be prepared to get your gear out and shoot handheld if required.

A polarizer and soft edge graduated filters will help in difficult lighting situations.

If you are carrying a lot of gear, walking poles will be a big help on this walk. Walking poles really help to take the pressure off your knees when wearing a heavy pack, especially when descending. The areas around Briach y Ddeugwm and Llyn Caseg Fraith will become particularly boggy during prolonged wet spells. Similarly watch out for clouds of midges during warm spells. You will find that it can often be very warm in the valley but completely different up in the hills. During my hike, the temperature varied from 15 degrees Celcius to 3 degrees Celsius.

Take plenty of layers, waterproofs and several litres of water. For photography, I particularly liked the area of Llyn Caseg Fraith and Llynn Bochlwyd, but there are lots more images to be had on this hike. Hunt them out and you will be rewarded.

Ogwen cottage will offer all the facilities you will need from toilets to a cafe. You can also park there but there is a charge, 20 minutes is free though. Parking on the pavement outside of Ogwen cottage is not advised though as I have heard of people getting a ticket there.

tryfan landscape photograph

photo settings 250 sec iso 200 f8 140mm

I hope you enjoy the walk.

Please feel free to share this post on your social media if you think others might like it, also check out my youtube video for a good look at the terrain and route. Feel free to print this info out and take it with you if you think it will be helpful on your journey. I would love to hear about your hike if you choose to take on this cracking circular route of Tryfan from the Ogwen valley.

Enjoy ATB Ian

Check out my photography gear

campsites

This weeks landscape photography vlog comes from the Ogwen valley in Snowdonia national park. I set up camp at the base of Tryfan and begin my hike which eventually leads to the summit of Tryfan.

As an Amazon Associate I earn from qualifying purchases.


Gwern Gof Uchaf http://www.tryfanwales.co.uk/

Gwern Gof Isaf https://gwerngofisaf.co.uk/


How to choose the best focal length for landscape photography

Focal length and how it can affect your landscape photography.

How to choose the best focal length for landscape photography

Each lens will have its own focal length. Wide lenses tend to fall around 16-35 on full frame whereas a telephoto zooms will be in the 70 -200mm range.

The focal length doesn't refer to the actual length of the lens it refers to the distance between where light converges in the lens and the front of the camera's sensor. When you increase the focal length or zoom in on a zoom lens, that point of conversion is moved away from the sensor increasing the focal length.

When we increase the focal length of a lens our subject becomes closer and our field of view becomes narrower.

When we decrease the focal length of our lens our subject will become further away and our field of view will become wider.

Focal length and field of view

The shorter the focal length the wider the field of view.

wide focal length

The longer the focal length the narrower the field of view will be.

focal length tips

18mm will roughly have a 90-degree field of view.

200mm will roughly have a 10-degree field of view.

field of view

For me, there are two other huge characteristics that lenses have, and we can use these as well as the reach of our lens to compose an image.

The first being depth of field.

So briefly what is depth of field?

The simple answer is, the distance between the nearest and furthest objects within your photo that appear acceptably sharp and this distance can be controlled by adjusting the aperture of the lens. F2.8, for example, will have a very narrow depth of field whereas f16 will have a much larger depth of field. Aperture will be for another post, so let's get back to focal length.

So focal length can also affect depth of field within an image. Typically the shorter the focal length the greater the depth of field. It may be possible to get the whole scene acceptably sharp with a very wide angle lens say 10mm at an aperture of only F5.6 whereas, if you shot the same scene at 200mm at f5.6 the depth of field would only be a few feet, unless we moved away from the subject of course.

This one of the reasons wide lenses are so popular in landscape photography apart from the field of view of course.

So let's talk about my second reason.

Compression

Lens compression is something that is really useful in landscape photography. It allows us to make objects feel closer together. This can be achieved by moving away from the foreground subject and using a longer focal length. This has the effect of reducing the distance between the foreground and background. This is great for mountain photography.

The amount of perceived compression is dependant on 2 things the focal length and the distance to your foreground subject. The further you are from your foreground and the greater the focal length the greater the compression will appear in your photo.

One thing to mention here is if you take a shot with a wide angle lens and take another from the same spot with a telephoto the perspective and compression will not change only the amount that the image is cropped. depth of field will also be reduced. The only way we can change the compression is by moving further away from the foreground elements.

So generally speaking when we use a telephoto lens we stand further away from our foreground subject, this results in an image where the background appears larger than it actually is. Also, the opposite with a wide angle we tend to stand a lot closer to our foreground subject making this feel larger than the background.


focal length in landscape photography

Both can have incredible results for landscape photography and can really help us to compose compelling images that look amazing.

So what focal lengths work well for landscape photography?

Choosing a focal length for landscape photography is an artistic choice and there really isn't a definitive answer, unlike say portraiture for example. Typically for portraits, we like to choose a focal length which will not make a person's features look distorted. Using a focal length between 35 and 50 mm will give great results because it is similar to how our own eyes see things. Landscape photography is completely different, because we are creating a piece of styled art, we are able to push the boundaries and use different focal lengths to achieve different looks.

Having looked at my landscape photography photographs for the last couple of years, a few things have become apparent. When I'm shooting in the woodland my focal length tends to vary between 28mm to 50mm. I think this is because I like the woodland to look as natural as possible and I never seem to want to make things look too distorted. When I'm shooting in the mountains however, it is a complete split between wide angle around 18mm and telephoto which generally falls anywhere between 100 and 200mm. When I'm shooting seascapes however my focal range almost always is very wide around 14mm - 18mm

This is just the way I shoot and it isn't really a conscious thing, it's just what I have found when looking at my focal lengths in my Lightroom catalogue.

Of course, this probably isn't very helpful because we will all have different interpretations of how a landscape should be captured. Putting your own artistic take on it is what it's all about.

So if I could only take one lens which would it be. When looking at my focal lengths it would depend on where I will be shooting.

Woodland would be the 24-70

Seascape would be the 16 -35

Mountains is a tuff one, but I would have to go with the telephoto 70-200 it just allows you to pick out compositions within the landscape from a distance and this is vital for mountain photography.

Focal length and depth of field.

As we mentioned before using a wide angle lens will typically give us a larger depth of field but again this is all relative to our distance to our foreground subject. In landscape photography I quite often like to get very close to my foreground subject and shoot very wide. Sometimes as close as a foot or so. When you get this close to your foreground it is almost impossible to gain enough depth of field in the scene to get everything acceptably sharp.

So what happens when we cannot get enough depth of field in our photograph?

When we cannot gain the correct depth of field we have 3 choices.

Firstly to let either the foreground or background fall out of focus.

Secondly to focus stack.

and thirdly introduce a tilt and shift lens.

The first method can be used to create a very artistic view of the landscape where the foreground elements are blurred and it appears as if you are shooting through the bokeh. You can also do this in reverse where you foreground subject is sharp and your background is blurred. This isolates your subject and can be great for flowers and trees.

Iā€™m no expert on tilt and shift lenses, but generally speaking a tilted lense will have an area of focus across the image, that area can be increased as the lens is tilted, this can give incredibly large depths of field.

Personally from the three choices I prefer to focus stack, mainly because I do not own a tilt and shift lens and because almost always, I like to have everything sharp in my landscape photographs. Focus stacking is a technique I use a fair bit as it allows me to use the sweet spot of my lens. I just take several images focused on different parts of the scene and blend them together in photoshop. it's pretty straight forward and incredibly effective.

I hope you enjoyed the post, feel free to check out the video below for more information and landscape photography tips.

As an Amazon Associate I earn from qualifying purchases.

How to use the histogram for landscape photography

USING THE HISTOGRAM FOR LANDSCAPE PHOTOGRAPHY

How to use the histogram for landscape photography

What is a histogram?

A histogram is a graph that shows the distribution of tones within an image. Most DSLR and mirrorless cameras have the ability to display a histogram through either the viewfinder or the rear LCD screen. The graph shows the darkest tones to the left, the brightest to the right and mid-tones, as you would expect, in the middle. You will see the graph rise depending on the number of tones within that particular area of the graph.

So if you took a photograph of a black piece of card you should have all of the tones on the histogram stacked to the very left in one line as shown in the example below.

underexposed histogram

The Same if you took a photo of a white piece of card. As shown below.

overexposed histogram

How should a histogram look for a photo?

So the histogram is a fantastic tool for gaining the correct exposure for an image. Quite often I rely solely on the histogram to give me an exact representation of a scene, it is particularly useful when bright sunlight is hitting the LCD and it is difficult to see the image clearly.

So how should the histogram look for a photo?

Well, to be honest, there isn't a definitive answer here, but there are some golden rules to follow.

Firstly, you do not want the histogram to be pushed to either edge of the graph as this will mean that you are losing detail in the shadows or highlights.

histogram pushed to the left

histogram pushed to the left

histogram pushed to the right

histogram pushed to the right

In landscape photography, you often hear the term protecting the highlights and the histogram will show you this. I always like to leave a little gap between the end of the graph and the start of my tones, this ensures that no detail will be lost.

I would say it is more pleasing to the eye to lose detail in your shadows than your highlights.

So now we know not to bunch the graph to the right, how should the rest of the histogram look?

The answer simply depends on the tonal range of the image. For example, if you are shooting a scene with mainly green fields that are evenly lit then you may see the graph evenly spread through the middle of the histogram. If the scene has a very large dynamic range, for example, a dark woodland and a bright sky we may see the graph spread out across the whole of the histogram, in extreme cases bunched towards each side with little in the middle. I really do not think there is such a thing as a perfect histogram. but one that doesn't reach either edge is ideal.

Below is a properly exposed histogram with no loss of detail.

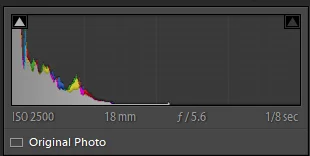
how a balanced histogram should look

What does clipping mean in photography?

Clipping refers to the loss of detail in either the shadows or highlights of a photograph, you may also hear the terms, clipping the blacks or blowing the highlights. Definitely, something to avoid.

Let's get technical, well a little bit...

Let's just dive into how the histogram is put together.

When you meter for a scene the camera will evaluate the tonal range within the image and show the number of pixels stacked on top of each other for that particular luminance value.

So the y-axis that runs from top to bottom represents the number of pixels per luminance value.

The x-axis represents the different shades of grey 0 on the left, which is pure black and 255 on the right which is pure white. This means the luminance will get lighter the further we move along the graph from left to right. If we take an image with the lens cap on, the histogram will show one line of pixels stacked on top of each other at the 0 end of the graph-pure black.

how to use the histogram for landscape photography

Problems with the histogram and how to avoid them.

Generally, I will shoot images with a raw and a jpeg back up. Shooting in raw is always advisable as you will be able to pull more detail from your image when post-processing.

One thing to look out for is how the histogram is displayed. For most cameras, the histogram will be a representation of the jpeg profile that you are shooting in. So if you are shooting in a vivid or a landscape profile you will see that the jpeg will have a lot more saturation and contrast compared to the raw file of the same image.

So why does this matter?

The histogram will be a representation of the jpeg profile, meaning it will be showing more contrast than that of the same raw file. Meaning the histogram will look completely different from that of the raw file. So when you are exposing the histogram for the jpeg file you will not be looking at an accurate graph. It is advisable to select a relatively flat jpeg profile to shoot in. Something that is closer to how the raw file looks. Standard or neutral is a good starting point. My cameras also allow me to adjust the shadows and highlights, so I turn these down to negative 1 which also helps. This doesn't affect the raw file just that of the jpeg which is being displayed and that of which the histogram is built around.

You will find a very good example of this in my video below - 3 histogram tips.

Check your RGB

Most histograms display the grey scale which is worked out as an average over the 3 colour channels, red, green and blue. So if you have a tricky exposure with a lot of red in your image it is definitely worth bringing up your RGB histogram and checking that as well. Sometimes one channel can be clipping and it doesn't show in the grayscale version, so always worth a quick look if your camera supports it.

Expose to the right?

You may have heard the term expose to the right and how this can improve your overall image quality, while I agree with this to some degree it isn't always advisable. Exposing to the right means pushing your histogram to the right-hand side of the graph as much as possible before clipping happens.

The benefits of exposing to the right are, that if your shadows are lighter then there will be a lot more detail in them. so you can darken the shadows in post-production to make them look correct. You will then have very noise free, highly detailed shadow areas. If your shadows are underexposed or darker, increasing them in post-production will add a lot of noise and they will show a lot less detail.

So why not expose to the right all of the time?

Well, you need to look at the scene you have in front of you. If the scene is of a dark woodland then it's natural the graph will be to the left. If the sky isn't included then the graph might not meet halfway. If we pushed the graph all the way to the right we would be massively overexposing and then colours start to get oversaturated and things get a little weird, sometimes this is impossible to correct in post. So ideally try to look at the scene think where the histogram should be and try to expose the image as you imagine the histogram to look. For example, if you take an image of a black wall and the pushed the histogram to the right, the image would no longer be black it would be a light grey. So just be wary of this.

What to do when the histogram reaches both edges and the highlights and shadows are clipping?

unbalanced histogram

Each camera will have a dynamic range in which it can display an image without losing detail. My cameras are around 12 stops of light. If the dynamic range of a scene is more than this, the histogram will be clipping at either side of the graph meaning we will need to take multiple images with different exposure values. This is referred to as bracketing. The other option is to use a graduated filter to reduce the exposure in certain areas of the frame. Recomposing can often help too.

Conclusion.

A histogram is a fantastic tool. I rely on it almost every time I am on a shoot. So if your camera supports it, put it on your LCD and make the most of its capabilities.

CHECK OUT THE GEAR I USE FOR LANDSCAPE PHOTOGRAPHY

As an Amazon Associate I earn from qualifying purchases.


Formatt-Hitech Firecrest 85mm ND Starter Kit review

formatt-hitech firecrest nd starter kit review

Formatt hitech Firecrest 85mm ND Starter Kit review

Purchasing a new filter system has been a high priority for me for a while now and one thing that I just couldn't put off any longer. Finding a review for the Formatt Hitech Firecrest 85mm ND kit was pretty difficult and there seems to be little information out there for this particular setup, so I hope you find this helpful.

So why Formatt Hitech.

So first off, let me just say that I am not sponsored by Formatt Hitech and I bought this filter system with my own money, so you can be sure that the opinions I am giving are as honest as can be.

I like to purchase products from within the UK if possible. Usually, products made here are very good quality and I like the idea of supporting local businesses as well.

Secondly, the form factor of the 85mm firecrest ND kit is a massive plus. As you will know, if you follow my Youtube channel, I like to keep my kit as lightweight and as minimal as possible and this system fits perfectly for my Fuji x cameras. I also believe it would suit most APS-C sized cameras too.

The specs and what is included within the kit

The Firecrest 85mm ND Starter Kit includes the following

77mm Firecrest circular polariser

Firecrest 85mm holder with polarizer control wheel

CPL rotates using the unique geared system within the holder

77mm, 72mm, 67mm, 58mm Step Rings

Luxury pouch

Firecrest ND 1.8 85x85mm (6 stops) view on Amazon https://geni.us/klJO

Firecrest GND 0.9 85x110mm (3 Stops) view on Amazon https://geni.us/b4QVRdq

Formatt Hitech say that their filters are made from Schott superwhite glass and have a multi-coating that is bonded in the middle to prevent scratches. The firecrest part refers to the coating which they say is made from a rare earth metal used to create hyper neutral ND's

The holder is made from aluminium and weighs only 110 grams.

formatt hitech firecrest nd starter kit

How it works.

Aside from the form factor and build quality, the usability is the main reason I have been so impressed with the system so far.

Unlike a lot of other brands such as lee, the polariser actually fits on the lens as opposed to the filter holder, meaning you can use it as a standalone circular polarizer which is great when a grad is not needed. The holder fits over the polarizer and the polarizer is then adjusted via the dial at the side. A really simple but effective design that works very well.

Should you not need the polarizer, you fit the supplied adapter ring to the lens first then attach the holder. Pretty straightforward really.

The holder comes with 2 slots for your ND's or grads but you can increase this to 3 with the supplied adapter. I haven't as I think I would rarely use three filters and the extra bulk and possibility of vignetting has meant I haven't bothered to try it. This may be different for other photographers.

Colour casts, vignetting and sharpness.

I could not see any colour casts from the side by side comparisons that I took. Image quality was surprisingly better than I was expecting and in both tests the overall sharpness and image quality was improved by adding the circular polarizer. Vignetting was non existent at 10mm on the fujinon 10-24mm lens and this is as wide as I need to go for my landscape photography.

CONS

There are only 3 negatives I can find with the firecrest 85mm ND filter kit and they are all very small ones.

The first being that if I ever decided to go back to full frame or medium format then I would need to purchase the larger 100mm kit. So if you are thinking that one day you may go to a larger system then investing in the 100mm would definitely be the way to go. However for me, as I said before, minimalism, size and weight are very important. So choosing the 85mm was a no brainer. Not really a negative for me, but maybe for others.

Secondly, if you attach the circular polarizer first, then set your shot up with your grads etc.. you are kind of stuck with the polarizer. The only way to take out the polarizer, would be to strip it right down and attach the adapter ring and set it up again. Alternatively, you could leave the polarizer on and turn down the polarization to its minimum. Making the decision first whether you need polarization is key. As long as you make the right decision at the start it really is a joy to use. Like I said this is just a small negative and the fact that you can use the polarizer as a standalone, far outweighs this small negative.

Thirdly, limited grads. Currently, I can only see that Formatt Hitech produce glass soft edge graduated filters for the 85 mm holder. If you need hard-edged or reverse grads then you will need to look into their resin range, View on Amazon: https://geni.us/XvxAm1d. I haven't tested these yet, but I do plan to, so look out for that post soon.

CONCLUSION

If you are looking to buy into a modular filter system for an APS-C sized camera then I really cannot see that there is a better kit on the market. I did briefly look at the lee 7five, view on Amazon: https://geni.us/CerfbG but as it is slightly smaller, there would have been vignetting on my wide angle lens and this is something I really didn't want. All in all, this is a professional grade system at a price point that I think is well justified for the quality of the product. Buying into a modular filter system really is an investment and if looked after well, should last a lifetime.

Please also consider watching the video review on youtube and subscribing for more content like this.


As an Amazon Associate I earn from qualifying purchases.

Please consider subscribing to my newsletter to be kept up to date with all the latest posts.